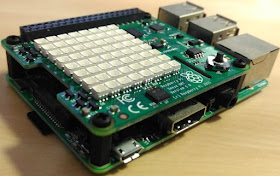
除了Raspberry Pi板子、Sense HAT與官方相機模組,還有那看起來金剛不壞的外殼,真帥,可惜沒賣。
規格如下:
- 8×8 RGB LED矩陣
- 含5個按鈕的搖桿
- 溫度(temperature)感測器,0-65°C (Accurate ±2°C)
- 相對濕度(humidity)感測器,20-80% rH (Accurate ±4.5%, in 15-40°C ±0.5°C)
- 大氣壓力(barometric pressure)感測器,260 – 1260 hPa (Accurate ±0.1 hPa)
- 加速計(accelerometer),±2/4/8/16 (g)
- 磁力儀(magnetometer) ,±4/8/12/16 (gauss)
- 陀螺儀(gyroscope),±245/500/2000 (dps)
- 尺寸:65.1mm x 56.6mm x 13.9mm
- 重量:20.4g
$ sudo apt-get update
然後安裝Sense HAT的程式庫:
$ sudo apt-get install sense-hat
照理說應該也會啟動I2C,若無,請自己執行raspi-config設定組態。然後重開機:
$ sudo reboot
軟體架構如下圖,有C/C++程式庫(RTIMULib)的部份,也有Python程式庫(python-sense-hat)。
$ cp -R /usr/src/sense-hat/examples/ ~/
有Python範例程式、也有C/C++的,後者需要下指令make進行編譯,以RTIMULibDrive11為例,這支程式可測試Sense HAT擴充板的所有感測器:
$ cd ~/examples/RTIMULib/RTIMULibDrive11
$ make
$ ./RTIMULibDrive11
可看到類似下列的輸出訊息,有roll、pitch、yaw、氣壓、海平面高度、溫度、濕度、
Settings file not found. Using defaults and creating settings file
Detected LSM9DS1 at standard/standard address
Using fusion algorithm RTQF
Detected LPS25H at standard address
Detected HTS221 at standard address
min/max compass calibration not in use
Ellipsoid compass calibration not in use
Accel calibration not in use
LSM9DS1 init complete
Sample rate 0: : roll:-0.639063, pitch:-1.415285, yaw:-43.705342
Pressure: 1025.0, height above sea level: -97.7, temperature: 25.2, humidity: 53.8
第一行說找不到設定檔,會使用預設值並新增;另可複製預先校正過的設定檔,讓測量結果更為準確:
$ rm RTIMULib.ini
$ cp /etc/RTIMULib.ini ./
再次執行RTIMULibDrive11,輸出訊息如下:
Settings file RTIMULib.ini loaded
Using fusion algorithm RTQF
Detected LPS25H at standard address
Detected HTS221 at standard address
Using min/max compass calibration
Using ellipsoid compass calibration
Using accel calibration
LSM9DS1 init complete
Sample rate 0: : roll:0.503324, pitch:1.209912, yaw:-2.244175
Pressure: 1025.1, height above sea level: -97.9, temperature: 26.2, humidity: 53.3
發現roll、pitch、yaw的值的確差異甚大。若想自己校準,請參閱Sense HAT - Raspberry Pi Documentation。
其他尚有許多範例程式,自己試試吧,如compass.py會以LED指出北方、rainbow.py與rotation.py各自秀出絢麗的動畫效果、text_scroll.py則是文字捲動,還有小遊戲snake貪食蛇。
自己動手寫寫程式,底下這支Python程式,會以LED矩陣營造跑馬燈效果,秀出文字「Hello Sense!」,影片在此(只有10秒而已):
from sense_hat import SenseHat
sense = SenseHat()
sense.show_message("Hello Sense!")
其實呢,Sense HAT有模擬器喔,在瀏覽器上頭就可以嘗試,嘿,真好:
$ sudo apt-get install python-sense-emu python3-sense-emu python-sense-emu-doc sense-emu-tools
哈,看到囉;模擬器可加速開發速度,然而模擬終歸只是模擬。
接下來,想想要做些什麼吧,不如看看MagPi與Hackster.io,參考別人開發的專案。
參考資料:
- Sense HAT - Raspberry Pi,規格介紹。
- [產品] Raspberry Pi Sense HAT 擴充板 - 台灣樹莓派,規格介紹。
- Sense HAT - Raspberry Pi Documentation,軟體安裝,程式庫介紹,範例程式,如何校準,EEPROM資料存取。
- Experiment with the Sense HAT - The MagPi Magazine Essentials,圖文並茂,非常精美。
- Worksheet - Getting Started with the Sense HAT | Raspberry Pi Learning Resources,程式撰寫簡易入門。
- Sense HAT emulator - Raspberry Pi。
- Raspberry Pi Sense HAT projects - Hackster.io,看看別人開發的專案。
- Sense HAT電路設計圖。
- Astro Pi網站。


