我的小白MacBook跟了我快五年了,任勞任怨盡忠職守,前一陣子發現觸碰板的按鍵失靈了,嗯,修理太貴了,買隻滑鼠插上就好了,更何況最近也沒帶他出去,一直都放在桌上,以遠端遙控的方式使用,不太需要那個按鍵。
後來有一天,整理桌子時,拿起MacBook才發現,怎麼底部鼓起來了,不會是因為夏天而熱脹冷縮吧?哇,上網一查才發現,那個是電池啊,電池腫起來囉。
嗯,好髒,待會要清理。

底部,右下角就是膨脹的地方。
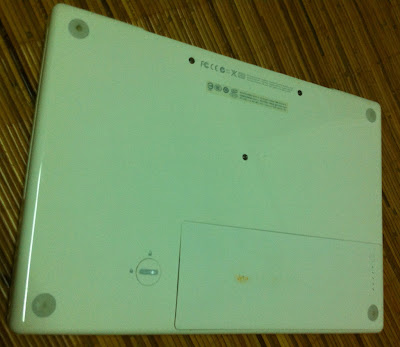
哇,鼓起來了,該不會爆炸吧?

上網搜尋後,得知不少人的小白也發生這種現象,還有人成功換到新電池的經驗,但那都是很久以前的事情了。

換顆新電池大概要2000~3000,嗯,算了,就冒著爆炸的危險繼續用吧,哈哈。
2012/08/24
小白電池膨脹囉

iOS儲存機密資料
怎麼在iOS上儲存機密資料呢,譬如密碼,這些資料必須加密後存放,不能被第三方輕易地竊取。到網路上搜尋後,大概會找到Apple官方的Keychain Service這套API,以及GenericKeychain這份範例程式碼。
經過一番奮鬥,詳細研讀Apple官方文件與網路上的教學文章後,我似乎勉強搞懂 SecItemCopyMatching、SecItemAdd、SecItemUpdate、SecItemDelete的用法與各種相關資料結構與常數的意義了。但是,這套API似乎太低階,當初設計的初衷大概考慮了讓多支軟體在同個環境內能共享或保護私密資料,對於我來說(只是想儲存專供我軟體使用的機密資料),非常難用,障礙很多,很容易出錯。
這種情形不就跟Joel說的一樣嗎,世界上有0.1%的人能學會C++寫程式,卻只有0.01%的人能搞懂ATL,而且每個人都留鬍子戴眼鏡,哇賽,還真的有這種讓人頭昏眼花的API啊。
或許Keychain Service還沒到那個地步,但實在不夠好用,還好,有人將Keychain Service雜七雜八的細節包了起來,提供一套輕便簡易的API,讓我們可以輕易地儲存機密資料,那就是STKeychain(前身為scifihifi-iphone)。
STKeychain原始碼放在GitHub的ldandersen / STUtils裡,位於子目錄Security裡,裡面有兩支檔案STKeychain.h與STKeychain.m,加入專案後,再加入Security.framework開發框架便完成了準備動作。(ldandersen / STUtils有許多子目錄,為其他不同功能,有興趣請自行試試看。)
因為我只使用STKeychain這兩支檔案,所以要把STKeychain.m前面的「#import "STUtils"」改成「STKeychain.h」。
STKeychain並未使用ARC,若你使用ARC的話記得在STKeychain.m檔加入編譯參數 -fno-objc-arc。
介面有三個,非常清楚。
首先是儲存,傳入你想儲存的username、password、serviceName,一般來說,username與serviceName是公開的,會儲存在別的地方,而這裡是把username與serviceName當做「鍵」的角色,將password儲存在安全的地方。參數updateExisting的意思是,若該筆資料已經存在的話要不要覆蓋過去,當出錯時可從參數error得到錯誤訊息,不需要就傳入nil;回傳BOOL代表儲存成功或失敗。
+ (BOOL)storeUsername:(NSString *)username andPassword:(NSString
*)password forServiceName:(NSString *)serviceName
updateExisting:(BOOL)updateExisting error:(NSError **)error;
然後是取出,傳入先前使用的username與serviceName,找出相對應的password回傳。
+ (NSString *)getPasswordForUsername:(NSString *)username andServiceName:(NSString *)serviceName error:(NSError **)error;
底下是刪除,應該無需多作說明。
+ (BOOL)deleteItemForUsername:(NSString *)username andServiceName:(NSString *)serviceName error:(NSError **)error;
這套API在iOS與Mac OS X上皆可使用,非常方便、簡單,太好囉,不用再跟Apple的Keychain Service奮鬥了!
2012/08/23
UIPickerView與NSTimer
朋友問我一個問題,在畫面上顯示UIPickerView,另外顯示一個UILabel進行倒數計時(譬如說從12.0秒倒數到0.0秒,每0.1秒更新)。
聽起來很簡單,不就用個NSTimer就搞定了嗎?可惜不是。
當倒數計時並更新UILabel時,若手指撥動UIPickerView,那麼倒數計時會暫停、UILabel也不會更新。

真正的原因我不清楚,大概是因為UIPickerView需要追蹤使用者的手指觸控事件,所以佔據了thread的runloop,使得NSTimer無法觸發吧。
解法之一是在另一個thread使用NSTimer:
float countdown = 120;
- (void)timerFireMethod:(NSTimer*)timer
{
if(countdown > 0){
countdown--;
self.label.text = [NSString stringWithFormat:@"%2.1f", countdown/10];
NSLog(@"%2.1f", countdown/10);
}
else{
[self suspendTimer];
}
}
- (void)suspendTimer
{
if(_timer != nil)
{
[_timer invalidate];
_timer = nil;
CFRunLoopStop([_runLoop getCFRunLoop]);
_timerThread = nil;
}
}
- (void)_startTimerThread
{
@autoreleasepool {
_runLoop = [NSRunLoop currentRunLoop];
_timer = [NSTimer scheduledTimerWithTimeInterval:0.1
target:self
selector:@selector(timerFireMethod:)
userInfo:nil
repeats:YES] ;
[_runLoop run];
}
}
- (void)resumeTimer
{
if(_timer == nil)
{
_timerThread = [[NSThread alloc] initWithTarget:self
selector:@selector(_startTimerThread)
object:nil];
[_timerThread start];
}
}
其中resumeTimer、suspendTimer是使用介面,把你想要執行的程式寫在timerFireMethod:裡。
解法之二是使用GCD(Grand Central Dispatch):
float countdown;
-(void)tick
{
self.label.text = [NSString stringWithFormat:@"%2.1f", countdown/10];
}
- (void)viewDidAppear:(BOOL)animated
{
[super viewDidAppear:animated];
countdown = 120;
queue = dispatch_queue_create("com.example.MyQueue", NULL);
ds_timer = dispatch_source_create(DISPATCH_SOURCE_TYPE_TIMER, 0, 0, queue);
dispatch_source_set_timer(ds_timer, dispatch_time(DISPATCH_TIME_NOW, 0), 0.1*NSEC_PER_SEC, 0);
dispatch_source_set_event_handler(ds_timer, ^(){
if(countdown > 0){
NSLog(@"tick %2.1f", countdown/10);
countdown--;
[self performSelectorOnMainThread:@selector(tick) withObject:nil waitUntilDone:YES];
}
else{
//over
}
});
dispatch_resume(ds_timer);
}
- (void)viewWillDisappear:(BOOL)animated
{
[super viewWillDisappear:animated];
dispatch_suspend(ds_timer);
dispatch_release(ds_timer);
dispatch_release(queue);
}
利用timer dispatch source便能每隔一段時間產生出某事件,然後指定想要執行的程式碼,要注意的是,想要更新iOS的畫面時,必須在main thread裡進行,所以上面程式碼使用了 [self performSelectorOnMainThread:@selector(tick) withObject:nil waitUntilDone:YES];這個方法。
應該也能以NSOperation與NSOperationQueue解決,但我還沒試。
參考文章:
- John Boydon的How to execute a NSTimer from NSThread 。
- Apple文件Threading Programming Guide、Timer Programming Topics、Concurrency Programming Guide、Grand Central Dispatch (GCD) Reference。
Subscribe to:
Posts (Atom)