My environment is Windows XP and Cygwin. I use Arduino Uno Rev 3,Arduino Software 1.0.
After using Arduino software(IDE) for a while, I felt it's not efficient. Every time I click Sketch-Verify/Compile or File-Upload, it takes a period of time. We can go to File-Preferences and click both "Show verbose output during: compilation and upload", to clearly see what steps it executes.
Besides compiling sketches, it also needs to compile the Arduino core source files in hardware\arduino\cores\arduino. But! It compiles them everytime. Why? Those files are not touched, they don't need recompilation. And If I use Sketch-Verify/Compile to check if the sketch is ok, then use File-Upload to upload to microprocessor, well, the Arduino software does it all over from the very beginning. It's no good.

Anyway, Arduino software(IDE, development environment) is not very smart. I'll introduce how to use make and Makefile to do compilation and uploading in Cygwin command line mode.
First of all, we still need to install Arduino software. We are going to use the command line mode(terminal) instead of the IDE, but still need various tools and Arduino core source files in it.
Then, install Cygwin. Download Cygwin's setup.exe here. Install it as following.
Launch setup.exe. We will download cygwin and install it from Internet, so choose first option "Install from Internet".

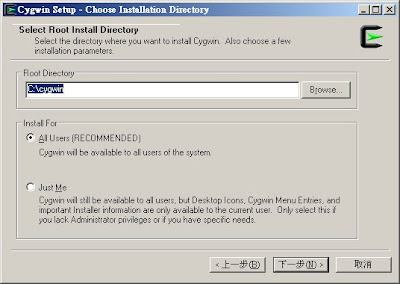
Specify a directory to install. Default is C:\cygwin. Don't not change it unless you know what you're doing.
setup.exe will keep the downloaded package in another directory. Please specify some path.

Specify internet connection according to your setting.

Then, choose a server to download. Maybe choose one according to your country.

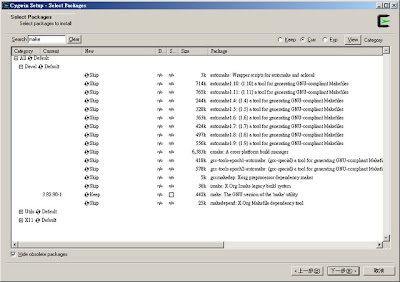
Then choose what packages to install. Defaults won't install "make". So we need to choose it manually.

Input "make" in Search field. Under "Devel" category, choose "make: The GNU version of the 'make' utility". It should show 3.82.90-1 or similiar version number.
Then download and install. setup.exe might prompt you to install some dependent packages, confirm it.
I also install many other packages, so my C:\cygwin is about 700 MB.
However, new version of make can't correctly handle the Makefile I wrote. So we need to revert back to version 3.80. Launch cygwin terminal, do the following steps to change back to 3.80.
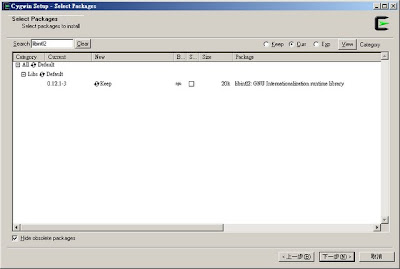
make 3.80 also need some library, so please launch setup.exe one more time, and install this library "libintl2".
Check it. execute "make --version" in cygwin terminal. It should respond "3.80".
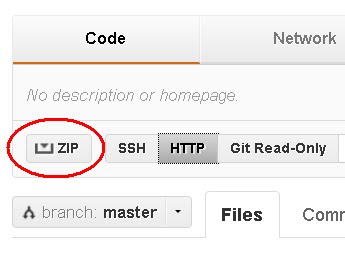
You can download the example sketch using make here. Use ZIP button to download all sketches I wrote. However, you only need the one in the directory "BlinkMakefile"
In the directory BlinkMakefile, there are total 6 files: BlinkMakefile.cpp, foo.c, foo.h, bar.cpp, bar.h, and Makefile。(Other directories contains my other Arduino practices. You can ignore them)
BlinkMakefile.cpp, the code will flash LED of pin 13. The difference is that we need to put#include <arduino.h>at the top of the file. Because, Arduino software does it for us, now we need to do it by ourselves.
For demonstration, I also add a C source file foo.c and its header file foo.h. It contains a function called delayDuration returning 1000 whatever. BlinkMakefile.cpp uses this value as the time period of lighting LED on.
For demonstration, I also add a C++ source file bar.cpp and its header file bar.h. It contains a class ClassBar, a member function getDelayDuration to return a value. Everytime you called this function, the value will increase 100. First time returns 100, second time returns 200, etc.. BlinkMakefile.cpp will use this value as the time period of lighting LED off. So the off period will become longer and longer.
Now comes to the main player Makefile. Excuse me for not explaining the syntax and meaning of Makefile in detail. I'm not an expert. Following are what you need to modify and adapt.
Originally, Arduino software use .pde or .ino filename extensions. Please change to .cpp.
PROJECT = BlinkMakefile
The filename of the final product files(.elf, .hex. .eep). Change to anything you want, better be no spaces.
ifndef PROJ_SOURCE
PROJ_SOURCE := $(wildcard *.c) $(wildcard *.cpp)
endif。
This will find out all sources file(.c and .cpp). Please put all souce files of your project in the same directory as the Makefile. Don't use sub-directories.
MCU = atmega328p
What microcontroller chip does your board use. Compiler needs this setting to generate correct binary machine code. My board is Arduino Uno Rev3, so uses atmega328p. Both compiling and uploading need this setting.
F_CPU = 16000000L
Frequency of the microcontroller. It seems the same for all boards to maintain backward compatibility, so you probably don't need to change.
ARDUINO_VERSION = 100
The version number of you Arduino software. This will pass into compiler, you can use this in code.
FORMAT = ihex
Output format. Probably no need to change.
PORT = \\.\COM3
Serial port. This is from Tools-Serial Port in Arduino software. You might be curious what is \\.\ for. This is related to some weirdness about argument specification, windows path, etc.. Anyway, just leave it.
UPLOAD_RATE = 115200
Transmission baud rate of the serial port. Normally it is 9600. But my board can use 115200. Uploading needs this setting.
INSTALL_PATH = D:/Arduino/arduino-1.0
This path should point to the top-most directory of the Arduino software. It's where containing the executable file arduino.exe, folder example, folder libraries, etc.. Please change it according to yours.
CORE = $(INSTALL_PATH)/hardware/arduino/cores/arduino
This path should point to the directory of Arduino core source files. It's where containing Arduino.h, wiring_analog.c, wiring_shift.c, etc.. I let it be a path relative to INSTALL_PATH.
BUILTINLIB = $(INSTALL_PATH)/libraries
Path to the Arduino built-in libraries containing EEPROM, Ethernet, LiquidCrystal, etc.. I let it be a path relative to INSTALL_PATH.
SKETCHBOOK = D:/Arduino/sketchbook
The sketchbook path. A path to your sketches/projects.
THIRDPARTYLIB = $(SKETCHBOOK)/libraries
Path to the third-party libraries(the external libraries you installed). I let it be a path relative to SKETCHBOOK.
AVRDUDE_PROGRAMMER = arduino
What programmer to upload the sketches/code/programs. "arduino" means to use the bootloader inside microcontroller to do uploading. According to your board, might be stk500, stk500v1, or stk500v2. Available settings please refer to the document of the tool avrdude which is used to do uploading(programming).
If you need to use the built-in libraries, please modify this line:
BUILTINLIB_ENABLED =
Put the names of libraries after the equal sign. For example:
BUILTINLIB_ENABLED = EEPROM Ethernet Firmata LiquidCrystal
(BUILTINLIB should point to the directory of the built-in libraries)
If you need to use third-party libraries, please modify this line:
THIRDPARTYLIB_ENABLED =
Put the names of libraries after the equal sign. For example:
THIRDPARTYLIB_ENABLED = BOUNCE
(Without saying, you have to download the libary, uncompress, put it in the directory pointed by THIRDPARTYLIB)
Others in the Makefile, they are related to the tool make. Please consult other document if you're interested.
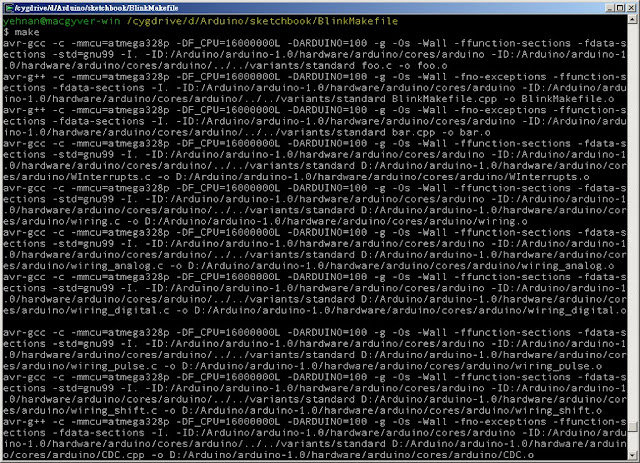
Now, launch cygwin terminal, change working directory to BlinkMakefile. Use the following commands to do compiling and uploading.
First of all:
If execute make again, it should appear make: Nothing to be done for `all'. Wonderful.
This is the screen snapshot of my executing make.
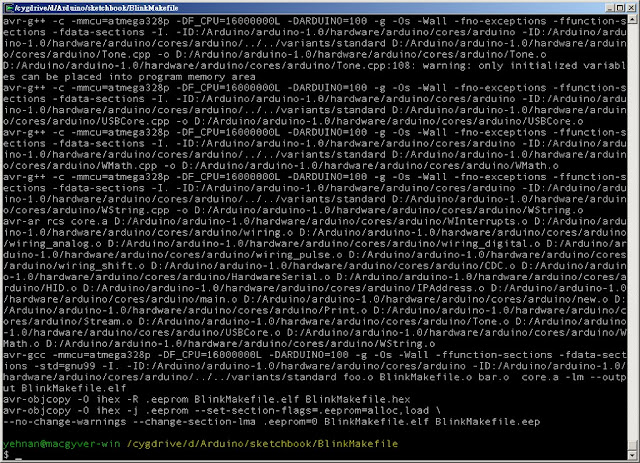
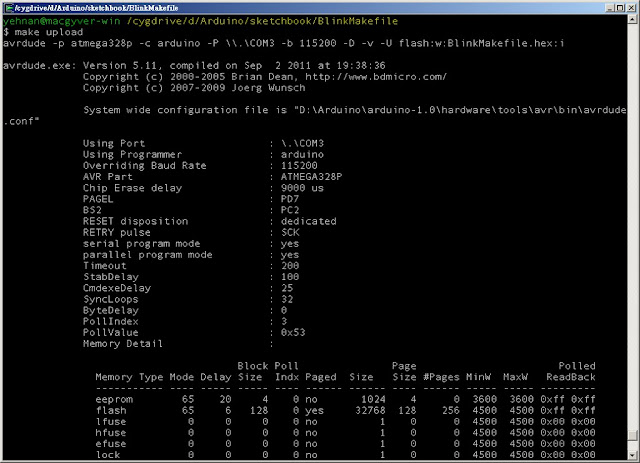
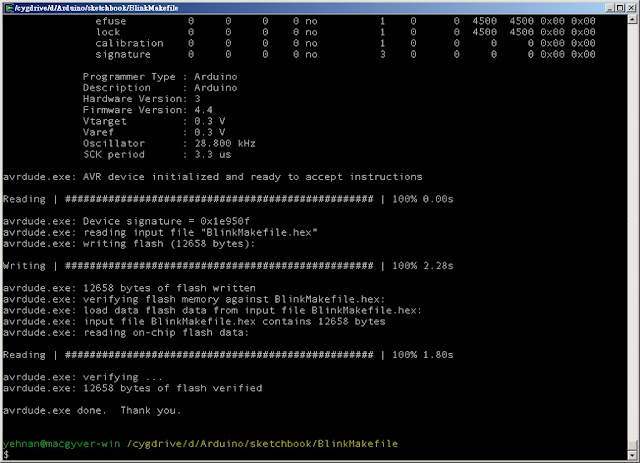
This is the screen snapshot of my executing make upload.
Well, there is a little problem. Originally we can use the Tools-Serial Monitor of the Arduino software. What now?
You can instead use Windows's HyperTerminal or Tera Term or PuTTY、Roger Meier's CoolTerm。
Done.
P.S. I use free version of avast! anti-virus software. It slows down exectuting make, avr-g++, and avr-gcc. So I need to execude those executable files in the avast! settings. (Before 60 seconds, after 5 seconds.)
參考資料:
- Arduino Official website,Arduino Build Process。
- Arduino Playground(wiki),Arduino from the Command Line,Windows command line build。
- Johannes Hoff: Arduino on the command line。
- Martin's Atelier: Arduino from the command line。
- Wikiid: Command line Arduino。
- AVRDUDE - AVR Downloader/UploaDEr,avrdude's arguments。
- avr-gcc、avr-g++、avr-ar、avr-objdump、avr-objcopy、avr-size。
- Dependency Generation with Subdirectories using gcc。
- GNU make, how to determine a path is a file or a directory?。
- GNU Make Manual。
thanks for the tutorial.
ReplyDeleteunfortunately this fails for me at "make depend".
i get "avr-gcc command not found" error.
any clues?
well, maybe put something like the following line
ReplyDeleteexport PATH=$PATH:/cygdrive/d/Arduino/arduino-1.0.5/hardware/tools/avr/bin
in ~/.bash_profile